Jul 24 2007
A new laser-based method for measuring millimeter distances more accurately than ever before - with an uncertainty of 10 picometers (trillionths of a meter) - has been developed and demonstrated by a physicist at the National Institute of Standards and Technology (NIST).
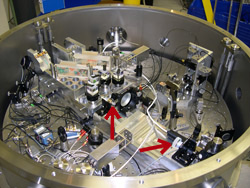
 This NIST vacuum chamber is used to measure millimeter distances more accurately than ever before. Laser light is sent into the chamber through an optical fiber and stored between two highly reflective mirrors (left and bottom arrows), which form an optical cavity. By measuring the frequency of the light, which is tuned to match specific properties of the cavity, a scientist can determine changes in the lower mirror's position with picometer accuracy. Image credit: J. Lawall/NIST
This is akin to measuring the distance from New York to Los Angeles with an uncertainty of just 1 millimeter. The technique may have applications in nanotechnology, remote sensing and industries such as semiconductor fabrication.
Laser light is typically used to measure distances by counting the number of wavelengths (the distance between successive peaks of the wave pattern) of light between two points. Because the wavelength is very short (633 nanometers for the red light most often used), the method is intrinsically very precise.
Modern problems in nanotechnology and device fabrication, however, require uncertainty far below 633 nm.
A more precise method, described in the December issue of the Journal of the Optical Society of America A,* involves measuring the frequency of laser light rather than the wavelength. The laser light is stored between two highly reflective mirrors, to create the optical analog of an organ pipe. The length of an organ pipe can be measured by driving the pipe with sound waves of a known frequency (pitch). The sound emitted by the pipe is loudest when it is driven at one of its “natural” frequencies, commonly called harmonics. When one or more of these frequencies is identified, the pipe length can be determined. In the NIST work, light is transmitted through both mirrors only when the frequency of the light matches a harmonic frequency. This frequency can be used to determine the distance between the mirrors.
While this approach has been used previously for the measurement of short distances (of the order of 1 micrometer), the new work extends it 25,000-fold by demonstrating a range of 25 millimeters. (Ultimately, the design should accommodate a range of up to 50 mm.) In addition, the NIST approach described in the paper excites two harmonics of the optical system, rather than one, a redundancy that increases the range while achieving picometer accuracy.
*J.R. Lawall. Fabry-Perot metrology for displacements up to 50 mm. Journal of the Optical Society of America A. December 2005.