Mar 13 2014
Two hand tools for measuring Hi-Lo gaps in SCRs (Steel Catenary Risers) and other fatigue-sensitive pipes are now available from oil & gas pipe measurement specialist Optical Metrology Services (OMS). The tools are easy to use and provide greater accuracy and repeatability than traditional Hi-Lo gap measuring methods.
 Closed Gap Tool
Every weld is critical to the successful creation of a pipeline. When welded, SCR pipes are required to have a very small (typically less than 0.5mm) internal mismatch in geometry or Hi-Lo gap. In the past, a variety of inaccurate and poorly repeatable methods have been used to measure the Hi-Lo gap, which also normally require a two-step process.
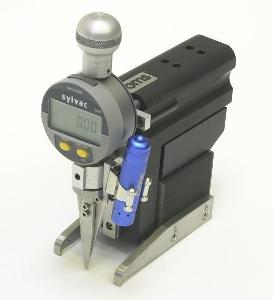
To solve these inaccuracy problems, OMS has designed and manufactured two new hand tools – the Pipe Checker ‘open gap’ Hi-Lo tool and the Pipe Checker ‘closed gap’ Hi-Lo tool. These tools are highly accurate, repeatable and faster to use than traditional measuring methods. The tools use a digital gauge to measure the Hi-Lo mismatch in a single operation. The open gap tool is designed to measure the internal Hi-Lo of an open gap bevelled pipe joint. The closed gap tool is developed for use with automatically welded pipe. Both tools are part of a family of Pipe Checker devices from OMS that offer greater accuracy and repeatability to quality assurance in pipeline welding.
Closed Gap Hi-Lo Tool
The Pipe Checker closed gap Hi-Lo tool is used to measure the Hi-Lo at the bottom of the J prepped pipes. The measurement is taken in one step that is both accurate and repeatable, avoiding any human errors.
The use of standard digital gauges means that the tool is simple to use and familiar to inspectors. The calibration/verification stand enables the user to set and calibrate the tool before use and thereafter to check that the tool is still within calibration limits. The closed gap tool is available in two variants: magnetic and non-magnetic. With the magnetic version, adjustments and reading values can be carried out without holding the tool. Both devices come with an LED light, which ensures that operators can check that the blade tips are in contact with the bevel in the correct place.
Open Gap Hi-Lo Tool
The open gap Hi-Lo tool is designed to replace manually read Vernier systems that are difficult to read and rely on the experience of the operator. Open gap welds are normally aligned with external line-up clamps so the tool has to fit into a relatively small space.
To operate the tool, the user pushes the blades into the gap between the pipes and turns the blades through 90 degrees. The head is then pulled up and the blades make contact on either side of the gap, to measure the Hi-Lo difference. As the head is constrained by the plunger slide, the system is repeatable, accurate and not subject to operator bias.
A range of optional extras are available including data logging software, which takes data directly from the gauge into a PC or laptop, making data collection easier and faster. Bluetooth versions of the tools are also available.
For more information on the Pipe Checker Hi-Lo closed and open gap tools, please visit the website at www.omsmeasure.com or telephone 01279 656038 or email [email protected]