Reviewed by Alex SmithApr 29 2022
Researchers at Lawrence Livermore National Laboratory (LLNL) have developed a novel all-optical ultrasound technique capable of conducting on-demand melt track characterization and fault detection in a common metal 3D printing process.
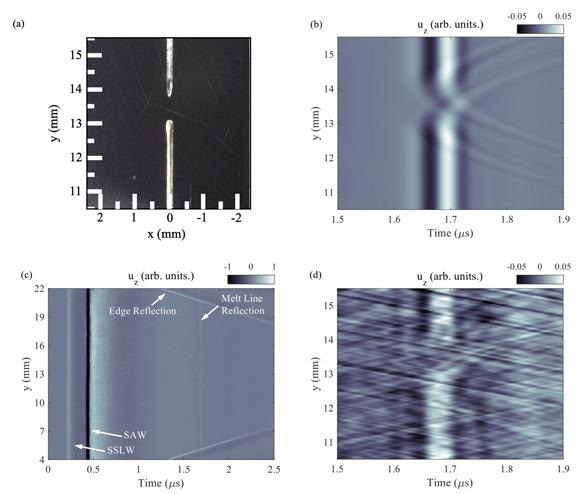
 A Lawrence Livermore National Laboratory team demonstrated that a diagnostic incorporating surface acoustic waves—generated by laser-based ultrasound—could effectively and accurately evaluate laser melt lines and find defects in laser powder bed fusion metal 3D printing by scattering acoustic energy from melt lines, voids and surface features that can be quickly detected. Images Credit: David Stobbe/LLNL.
Lab researchers suggest a diagnostic employing surface acoustic waves (SAW), created by laser-based ultrasound, that may uncover microscopic surface and sub-surface faults in laser powder bed fusion (LPBF) metal 3D printing in a report published in Scientific Reports.
By scattering acoustic radiation from melt lines, voids and surface characteristics that can be immediately recognized, the team claims its technology can effectively and precisely analyze laser melt lines — the tracks where its laser liquefies metal powder in LPBF printing. Optical microscopy and X-Ray computed tomography were used to confirm the findings (CT).
We hope that this work demonstrates the potential for an all-optical ultrasound system capable of rapid, on-demand in situ characterization of LPBF processes and powders. The demonstrated laser-based ultrasound, surface acoustic wave system showed excellent sensitivity to surface and near-surface features, including breaks in the LPBF melt line, metal surface splatter and subsurface air voids.
David Stobbe, Study Principal Investigator and Engineer, Lawrence Livermore National Laboratory
Surface acoustic waves have long been utilized in engineering materials to define the surface and near-surface features like cracks, pits, and welds, and they are also employed in geology to identify underground structures like caves on a far longer length scale. According to experts, SAWs are well-suited for identifying melt lines in LPBF printing because of their surface and near-surface sensitivity.
To explore this possibility, the LLNL researchers used a fiber laser pointed into a vacuum chamber to make laser melted lines, as well as 100-watt, 150-watt and 350-watt powered lasers to produce samples of titanium alloy for study. Researchers then devised a method for creating and detecting surface acoustic waves, generating ultrasound using a pulsed laser, and measuring displacement with a photorefractive laser interferometer.
The researchers also ran simulations to help comprehend the data and inform the experimental measurements. Scientists modeled and measured the pulsed laser’s displacement, which revealed scattering from the melt line as well as cracks in the melt line, metal spatter near the melt line, and subsurface air voids underneath the melt line. The scientists tested the same characteristics experimentally and found that simulation and experiment were quite similar.
Optical microscopy for surface features and X-Ray computed tomography for sub-surface characteristics were used to confirm the outcomes of laser-based ultrasound (LBU) investigations. Researchers found that the LBU system is “better suited to perform real-time inspection and can gather and analyze data at a faster rate” than the X-Ray CT system.
Utilizing the laser-based ultrasound significantly shortened the time for subsurface void detection compared to conventional X-ray CT from days to minutes. While more development would need to be done before implementation of this diagnostic for in-process monitoring, our team is excited by these initial findings.
Kathryn Harke, Study Lead Author and Engineer, Lawrence Livermore National Laboratory
While the technology is well-suited for in situ application in LPBF printing, the size and depth of observable voids are limited, according to lab researchers, and in situ monitoring or post-build inspection will require additional development.
A system like this may find use for rapidly qualifying new LPBF machines and in-service machines after changes to metal powder feedstock or modifications to the melt laser power or scan speed.
David Stobbe, Study Principal Investigator and Engineer, Lawrence Livermore National Laboratory
The Laboratory Directed Research and Development (LDRD) program supported the research.
Joe Tringe, who created the LDRD study, and Nick Calta, who constructed the LPBF samples and performed optical microscopy, were laboratory co-authors.
Journal Reference:
Harke, K. J., et al. (2022) Laser-based ultrasound interrogation of surface and sub-surface features in advanced manufacturing materials. Scientific Reports. doi.org/10.1038/s41598-022-07261-w.