Jul 7 2015
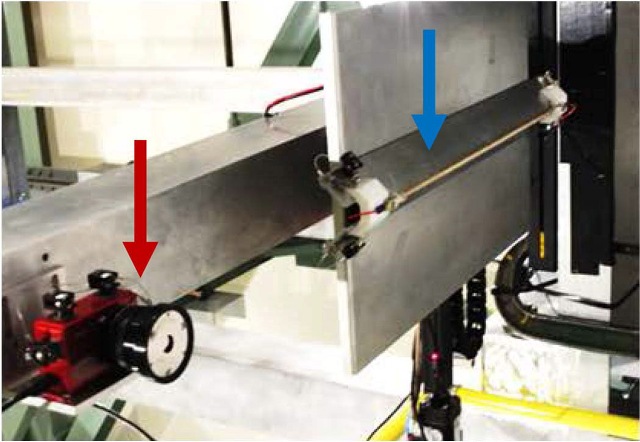
 Photograph of the Scanning Long-wave Optical Test System (SLOTS). The long-wave IR (LWIR) camera (red arrow) and the tungsten ribbon IR source (blue arrow) are indicated.
Researchers from the College of Optical Sciences, University of Arizona have developed a new IR deflectometry system that has the capability to overcome the limitations demonstrated by currently used metrology approaches for production of freeform optics.
This novel system provides fine spatial resolution and a high dynamic range for metrology applications.
Mainstream optics fields are being redefined by the advent of freeform optics. However, non-availability of precise metrology methods for enabling efficient production is preventing certain applications in freeform optics. Freeform optics has a flexible and wide design space that enables design of advanced form factors and concepts for optical systems.
The Giant Magellan Telescope (GMT) is an example of a next-generation astronomy telescope that uses freeform optics to enhance performance. The GMT is a combination of a number of freeform primary mirror segments that are highly aspheric.
A speedy and accurate manufacturing technology is one among the remaining factors that has acted as a barrier for complete realization of freeform optics, which would enable production of customized complex optics.
Rapid optics manufacturing involves a high rate of material removal, and hence it is preferable to perform accurate surface figuring when grinding is done. As an example, a surface error that can be removed with one minute of grinding, may take more than 1000 minutes when done during the polishing process.
Existing metrology techniques curtail such grinding options. Presently, IR interferometers or laser trackers are used for grinding phase metrology; however, they have a low dynamic range, low accuracy and a coarse spatial resolution that affect their efficiency as metrology options. The IR interferometer also needs a costly custom null IR optics system for measuring freeform surfaces.
The research team has developed a new IR deflectometry system to address such limitations. In deflectometry, the light deflection from a recognized source is measured. The surface profile that the light interacts with is derived from back calculations.
The team made direct measurements of local slopes employing deflectometry. It obtained highly precise surface profiles of the surfaces of the optics. It used a scanning thermal long-wave IR (LWIR) source in a scanning long-wave optical test system (SLOTS), and produced a 7μm –14μm spectrum that was reflected by the coarse optical surfaces. SLOTS helped produce precise surface maps of ground freeform optics. These optics had approximately 0.7μm –1.6μm root mean square (RMS) surface roughness.
The research team was able to achieve nearly 1μm accuracy with a large dynamic range and high 400×400 pixels spatial resolution. As an example, a 9mm freeform departure with a 4.2m diameter was achieved over the test surface. Additionally, the total measurement time was short due to SLOTS’ fast scanning capability. This method enabled a test surface of 4.2m-diameter to be measured within a minute.
The SLOTS deflectometry concept involves scanning of a tungsten ribbon at 300°C. LWIR radiation is emitted in two orthogonal directions. The test surface reflects some of the rays from the tungsten ribbon, and these rays then propagate toward the aperture of the LWIR camera. The team configured the camera for imaging the test surface plane, in a manner such that each pixel of the camera matched a local test surface area.
During a scan, the ribbon’s temporal position and the thermal image’s temporal intensity change were matched. Based on a ray-trace, the researchers were able to calculate the test surface’s local slopes. The surface height was then obtained by integrating values.
A sequence of images obtained by performing a continuous scan showed that when the hot tungsten ribbon was scanned, certain areas that had slopes reflected the LWIR light in a manner such that it went through the aperture of the camera and then on to the detector.
The team utilized SLOTS for helping guide the grinding process for the Daniel K. Inouye Solar Telescope’s (DKIST) 4.2m-diameter primary mirror. This mirror is an off-axis parabolic that has an approximately 9mm freeform aspheric departure. The researchers also obtained the higher-order shape departure. This was obtained after subtracting the initial eight standard Zernike terms.
Furthermore, based on SLOTS data, they used 25μm loose abrasive grits to conduct deterministic fine grinding runs. SLOTS were used to measure the DKIST primary mirror surface error’s evolution. Three successive runs were conducted by the team to target the high-resolution initial error map. The important spatial frequency errors were shown by this error map. This enabled the team to enhance the RMS surface shape error to 2μm from 15μm.
SLOTS demonstrates that it is a precise method for performing fast metrology of finely ground freeform optical surfaces. Additionally, this enables utilization of challenging computer-controlled optical surfacing (CCOS) processes for grinding in the early phases.
Tests conducted by the team revealed that during the grinding phase the DKIST primary mirror had rapid convergence. Hence, coupling of the SLOTS metrology system and the CCOS processes could help reduce the time required for freeform fabrication.
The research team now intends to utilize SLOTS for the GMT off-axis segment project and other such astronomical optics manufacturing projects. Additionally, it also plans to utilize SLOTS for guidance in additive 3D printing technologies to produce freeform optics components with rough surface finishes.