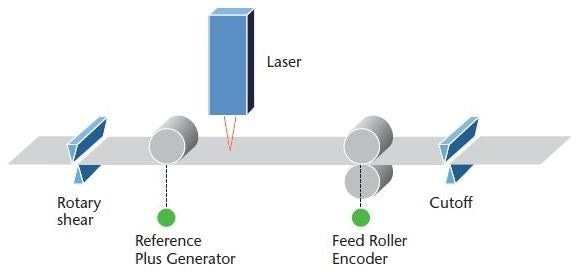
As well as triggering at the correct length, an understanding of web speed is essential to synchronize the movement of the cross cutter. In practice, the solutions are twofold for measuring the line reference. Firstly, a classic measuring wheel during standard production can be employed, and secondly, a feed roller encoder that is selected during a size change, known as the “order change” (fig. 1) can be used. To realize higher levels of accuracy, a non-contact laser surface velocimeter was applied.

Comparison Between Laser Measuring System and Existing Measuring Methods
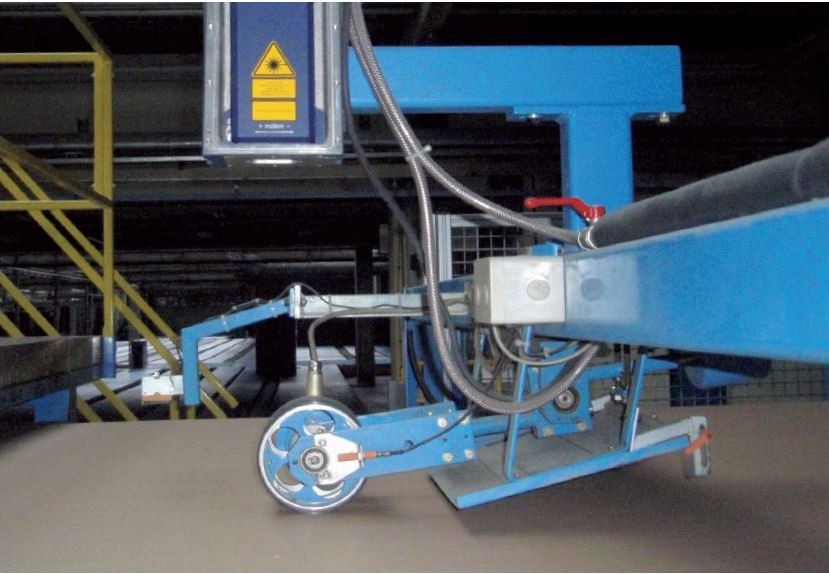
The laser measuring system was used over an encoder wheel for cross-cutter control of the corrugator (large image) as part of the investigation, and the cut sheets, around 200 different sizes and in a wide variety of qualities, were then measured again manually.

Figure 1. Process flow at a cross-cutter.
Behavior was also investigated using various operating speeds of the plant. The biggest challenge the measuring systems contended with was the continuously changing plant velocities, and the instrument from Polytec realized the best results: no deviations of more than ±1 mm were measured under all operating conditions.
Results of the Idler/Laser/Encoder Comparison
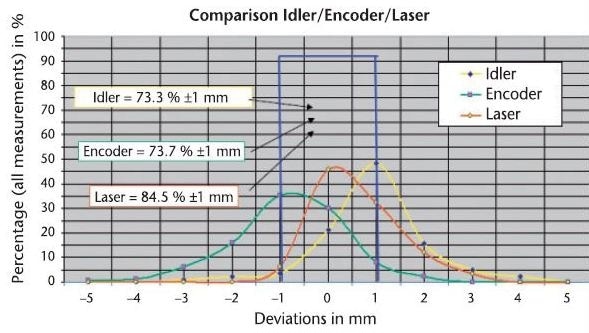
To provide a suggestion of the size of the cut length error relative to the sheet length for the three measuring systems, figure 2 illustrates all three curves in the same diagram.

Figure 2. Measurement deviations for all measurement systems.
The foundation of the analysis is based on a range of 3 x 1500 measurements of varying sizes, velocities, and qualities of the corrugated board. The laser delivers very good results, it does not deviate on cut length by more than 3 mm, and the greatest percentage of the measurements, standing at around 45%, demonstrate no deviation at all from the actual cut length.
Conclusions
The high, absolute accuracy and repeatability of the laser measuring system cannot be attained with the conventional idler encoder and feed roller encoder. Additionally, a substantial difference in performance is evident when comparing the laser measuring systems and idler systems and contact wheels.
Laser measuring systems provide a measurable development over these conventional methods, and, for customers struggling with sustaining specified cut length tolerances due to slippage, changing wheel diameter and overall wear and tear, the LSV delivers better accuracy and enhanced repeatability with long-term stability.
These are the three factors needed for long-term quality, reliable process control and better yield. The higher investment cost for the laser compared to traditional tactile methods is the reason why the deployment area for the laser measuring system should be separated. For example, the investment pays off quickly for customers who work with varying, and in particular, very large cut lengths and high-quality spectra, as well as where accuracy is essential.

This information has been sourced, reviewed and adapted from materials provided by Polytec.
For more information on this source, please visit Polytec.